Pantry Getting Messy Fast Solutions: Smart Kitchen Organization Tips That Actually Work
You organize your pantry perfectly on Sunday, but by Wednesday, boxes are falling over, bags are ripped, and you cannot find the cumin anywhere.
TL;DR: A messy pantry isn’t your fault — it’s a system problem. Most pantries fail because they mix different container types, use deep shelves poorly, and lack zones for different food categories. The solution is five simple steps: empty everything, group like items, use clear containers, install shelf risers, and label everything. Once set up, a quick five-minute reset each week keeps it tidy forever.
🔵 Key Takeaways
- Deep pantry shelves hide food in the back, leading to forgotten items and duplicate purchases.
- Mismatched boxes and bags create unstable stacks that collapse every time you reach for something.
- Clear, airtight containers keep food fresh and let you see when supplies run low.
- Shelf risers double your usable space by creating two levels on one shelf.
- A weekly five-minute tidy prevents the slow creep of pantry chaos.
The Real Causes of Pantry Mess and How to Fix Them Forever
You are not lazy. Your pantry is not cursed. The real problem is that most pantries are designed for grocery stores, not for home cooking. Deep shelves encourage shoving things to the back. Odd-shaped boxes and bags do not stack well. And when one thing falls, everything falls.
The good news? You can fix all of these problems with basic kitchen organization tools that cost very little money. The solutions in this guide work for renters, homeowners, small pantries, walk-in pantries, and even cabinet pantries. No renovation needed.
Why Deep Shelves Ruin Your Pantry Organization
A shelf that is 18 inches deep sounds great. You can fit so much food. But here is what actually happens: you put new groceries in front of old groceries. The old groceries get pushed to the back. You forget they exist. They expire. You buy more. The cycle repeats.
The solution is shelf risers. These simple metal or plastic platforms create two levels. Canned goods go on the lower level. Shorter items go on the upper level. Everything stays visible.
Step-by-Step Guide: Build a Pantry System That Stays Clean
Follow these steps one weekend. The next weekend, you will spend only five minutes maintaining it.
Step 1: Empty Your Entire Pantry
Take everything out. Every jar, box, can, bag, and random snack. Put everything on your kitchen counter or dining table. As you pull items out, check expiration dates. Throw away anything expired. Donate unopened non-perishable food you will not eat.
This is also the perfect time to wipe down all pantry shelves with warm soapy water.
Step 2: Sort Everything Into Zones
Group similar items together on your counter. Common pantry zones include:
- Canned vegetables, fruits, and soups
- Baking supplies (flour, sugar, chocolate chips)
- Breakfast foods (cereal, oatmeal, pancake mix)
- Pasta, rice, and grains
- Snacks (chips, crackers, granola bars)
- Oils, vinegars, and cooking sprays
- Spices and seasonings
- International or specialty ingredients
Do not skip this step. Zones are what make your pantry easy to use every single day.
“A well-organized pantry is not about having less food. It is about knowing exactly where every single item lives. Zones create that knowing.”
Step 3: Transfer Food Into Clear, Airtight Containers
This is the single most effective kitchen organization tip in this entire guide. Those flimsy cereal boxes? They collapse. Those resealable chip bags? They never close fully. Those paper flour bags? They tear and leak white powder everywhere.
Move these items into clear containers:
- Cereal
- Flour
- Sugar
- Rice
- Pasta
- Oats
- Chips and crackers
- Baking mixes
- Dried beans and lentils
Use containers that are rectangular, not round. Rectangular containers fit together without wasting space. Choose BPA-free plastic, glass, or stainless steel. Glass looks beautiful but costs more and can break if dropped. Plastic is lighter and safer for high shelves.
Safety reminder: Always wash and completely dry containers before adding food. Moisture leads to mold, even in dry goods.
Step 4: Install Shelf Risers and Turntables
For deep shelves, use shelf risers. These create two levels. Put taller items like oil bottles and cereal containers on the bottom level. Put shorter items like tuna cans and spice jars on the top level.
For corner shelves or deep cabinets, use lazy susan turntables. Spin them to reach items in the back without knocking anything over. Turntables work perfectly for:
- Spices
- Jars of sauce
- Oils and vinegars
- Small cans
Measure your shelf depth and width before buying risers or turntables. Nothing is more frustrating than a turntable that does not fit.
Step 5: Label Everything
Labels turn a good pantry into a foolproof pantry. When every container has a label, everyone in your home knows where things go. That means your partner or kids can help with groceries and cleanup without confusion.
Use a label maker or simple masking tape with a marker. Label each container with the food name. For extra help, add the expiration date or the date you transferred the food.
Labels also help you remember what is inside similar-looking containers. No more guessing which white powder is flour versus powdered sugar.
Step 6: Create a Snack Station
Snacks are the number one cause of pantry mess. People grab a bag, shove it back carelessly, and the whole stack tumbles.
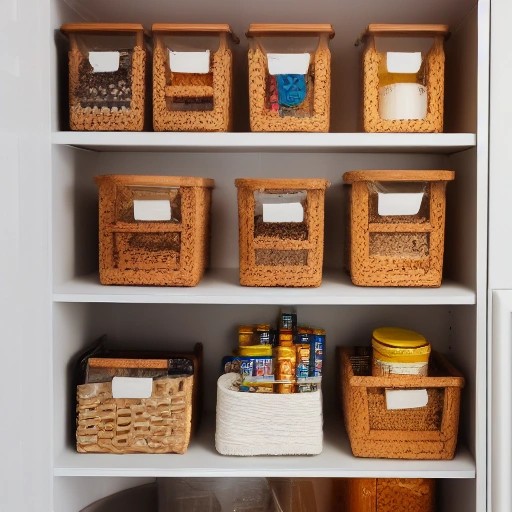
Fix this by dedicating one lower shelf or one clear bin to snacks only. Use small bins inside that shelf to separate different snack types: one bin for chips, one bin for granola bars, one bin for fruit snacks. When snacks live in bins, they do not fall over.
Step 7: Maintain With a Five-Minute Weekly Reset
Every Sunday, spend five minutes on your pantry. Pull everything forward. Push nothing to the back. Check for empty containers that need refilling. Wipe up any crumbs. Move older items to the front and newer items to the back.
This five-minute habit prevents the slow, frustrating slide back into chaos. Set a phone reminder for the same time each week.
Comparison Table: Pantry Organization Containers and Tools
| Item | Best For | Durability | Cost | Space Efficiency |
|---|---|---|---|---|
| Clear plastic rectangular containers | Cereal, flour, rice, pasta | High | Low | Excellent |
| Glass jars with airtight lids | Spices, nuts, dried herbs | Very High | Medium | Good |
| Lazy susan turntables | Corner shelves, sauces, oils | High | Medium | Very Good |
| Shelf risers (metal or plastic) | Deep shelves, canned goods | High | Low | Excellent |
| Wire basket bins | Snacks, potatoes, onions | High | Low | Good |
| Stackable can racks | Soda cans, tomato sauce cans | Medium | Low | Very Good |
Pantry Mess Causes by Percentage
How to Organize a Small Pantry or Cabinet Pantry
Not everyone has a walk-in pantry. Small pantries and cabinet pantries need special solutions.
Use the door. Over-the-door organizers are not just for shoes. Clear pocket organizers hold spice packets, seasoning mixes, and small snack bars. Magnetic racks stick to the inside of metal pantry doors and hold spice tins.
Go vertical. Stackable shelf risers matter even more in small spaces. Double your shelf space immediately. For canned goods, use can stackers that let you load from the top and take from the bottom.
Use bins for everything. In a small pantry, bins act like drawers. Pull out a bin to see everything inside. Push it back in to save space. Label each bin clearly.
Measure your shelf height before buying bins. Bins that do not slide in easily will frustrate you and ruin the system.
Smart Storage for Bulk Items and Costco Hauls
Bulk buying saves money but destroys pantry organization if you are not careful. Use these tips for bulk storage.
Decant into smaller containers. Keep one week’s worth of rice or flour in an easy-to-reach container. Store the bulk bag in a less convenient spot, like a high shelf or a separate closet. Refill the small container as needed.
Use uniform bins for bulk packages. Those giant boxes of snack bars or bags of coffee beans? Put each bulk item into its own labeled bin. Bins keep bulk packages contained so they do not crush other items.
Store heavy bulk items low. Cases of canned goods, large jugs of oil, and big bags of rice go on bottom shelves. Heavy items on high shelves are dangerous and hard to lift down.
Safety reminder: Never store heavy items above shoulder height. If you need a step stool to reach something, it belongs on a lower shelf.
Maintenance Habits for Long-Term Pantry Success
You built the system. Now keep it running with these tiny daily habits.
One-in, one-out rule. When you buy a new jar of pasta sauce, move the oldest jar to the front. Finish that jar before opening the new one. This prevents expired food from piling up in the back.
Shop your pantry first. Before going to the grocery store, check what you already have. Plan meals around pantry items that are getting old.
Clean as you cook. When you take something out of the pantry, wipe up any crumbs immediately. Close containers fully before putting them back.
Use the “first expired, first out” rule. When putting away groceries, move older items to the front. Put new items in the back. This is the grocery store trick that actually works at home.
FAQ: Quick Answers to Pantry Organization Questions
Why does my pantry get messy so fast even after I organize it?
You likely have mismatched containers that do not stack well, or you are missing zones and labels. Without labels, family members put items back in the wrong spots.
What is the best container for pantry storage?
Clear, rectangular, BPA-free plastic containers with airtight lids. They stack perfectly, show contents at a glance, and keep food fresh.
How often should I clean out my pantry completely?
Every three months for a full cleanout. Check expiration dates, wipe shelves, and reorganize zones if needed.
Can I organize a rental pantry without permanent changes?
Yes. Use shelf risers, turntables, bins, and containers that sit on existing shelves. No drilling or mounting required.
What should I do with expired pantry food?
Empty liquid or wet foods into the trash (not down the sink). Compost dry goods like flour and rice if possible. Recycle packaging.
How do I organize spices in a small pantry?
Use a wall-mounted spice rack, a tiered shelf riser, or small bins labeled A–Z. Stackable magnetic tins on a metal sheet work great for tiny spaces.
Does organizing the pantry actually save money?
Yes. When you can see what you have, you stop buying duplicates. Studies show organized pantries reduce food waste by up to 30 percent.
When Your Pantry Needs a Bigger Solution
Sometimes pantry mess is not about organization — it is about space. If you have decluttered, added risers and bins, and still cannot fit your groceries, consider these options.
Add a rolling cart. A stainless steel utility cart next to the pantry holds overflow items, potatoes, onions, or bulk buys. Roll it out of the way when not in use.
Use cabinet space elsewhere. Store infrequently used items like slow cookers or party platters in a different cabinet. Use that pantry shelf for food instead.
Install wall shelves. If you own your home, add floating shelves above the pantry door or on an empty wall. Store extra canned goods or backup snacks there.
Share bulk purchases with a neighbor. If you cannot store a 20-pound bag of rice, split it with a friend. You both save money and save pantry space.
Which kitchen problem do you want solved next? Share your thoughts in the comments.
References: